
library(MASS)

set.seed(42)

n <- 500
mu <- c(x = 0, y = 2)
Sigma <- matrix(c(1,0.5,0.5,0.3),2)
data <- mvrnorm(n = n, mu = mu, Sigma = Sigma)

attach(as.data.frame(data))Introduction
In this blog post, we will both look at the analytical solution for the linear regression model as well as at how to find the model parameters with the gradient descent algorithm. Furthermore, we will look at why gradient descent might be useful for linear regression, even if we do have an analytical solution.
Generating a synthetic dataset
We will start by creating some easy to understand dataset. We’ll be working with only two variables \mathbf x \in \mathbb R^n and \mathbf y \in \mathbb R^n. We draw those from a multivariate Normal, where the entire dataset is \mathcal D \sim \mathcal N(\boldsymbol \mu, \boldsymbol \Sigma) with the mean vector \boldsymbol \mu and the covariance matrix \boldsymbol \Sigma. To achieve this, the R package MASS comes in handy.
Note, that to simplify the following code structure, the variables in data are being attached to the R search path. Now, we are ready to start the adventure!
Linear regression
The linear regression model is arguably the most widely used statistical and machine learning model in the world. In our toy example, we are only dealing with a single independent and a single dependent variable – which we can model with a simple linear regression according to Equation 1. y_i = \beta_0 + \beta_1 x_i + \varepsilon_i \tag{1} We might also call the model parameters the \beta_0 the intercept and \beta_1 the slope. Since we created the data ourselves from a known distribution, we know the true values of those model parameters (i.e. \beta_0 = 2, \beta_1 = \frac{1}{2}). Keep in mind that we only look at the simple linear regression model because it is possible to display the procedure visually. Everything that is done in this blog post could effortlessly also be applied to the multiple linear regression model which is displayed in Equation 2. \mathbf y = \mathbf {X} \boldsymbol \beta + \boldsymbol \varepsilon \tag{2} In fact, we actually also have multiple predictors in our simple linear regression model case – it’s just that one of those is a constant, thus it forms the intercept. For following calculations we still need to specify the full matrix that we’ll use though. It’s called the design matrix \mathbf X and it includes two columns: one for the intercept (i.e. the constant value 1) and one for the independent variable \mathbf x. In R, we can create this design matrix as follows:
X <- cbind(1, x)The first thing we are going to use this design matrix for is finding the analytical solution to the ordinary least squares problem, before we move to the gradient descent algorithm.
Finding the analytical solution
The most common approach to estimate the coefficient vector \boldsymbol \beta for linear regression is the ordinary least squares estimator. With that, we choose the values for the coefficients such that the sum of squared residuals is minimized (Equation 3). \boldsymbol {\hat \beta} = \arg \min_{\boldsymbol \beta} \| \mathbf y - \mathbf X \boldsymbol \beta \|^2_2 \tag{3} The minimization task in Equation 3 is solved when the gradient of the loss function with respect to the coefficient vector is all zero. To solve this analytically, we expand the whole term as in Equation 4, and then we proceed to take the partial derivative with respect to \boldsymbol \beta and set it to the zero vector \mathbf 0 in Equation 5.
\begin{aligned} \| \mathbf y - \mathbf X \boldsymbol \beta \|^2_2 = \left( \mathbf y - \mathbf X \boldsymbol \beta \right)^\top \left( \mathbf y - \mathbf X \boldsymbol \beta \right) = \\ \mathbf y^\top \mathbf y - \mathbf y^\top \mathbf X \boldsymbol \beta - \boldsymbol \beta ^\top \mathbf X^\top \mathbf y + \boldsymbol \beta ^\top \mathbf X^\top \mathbf X \boldsymbol \beta \end{aligned} \tag{4}
\begin{aligned} \frac{\partial \left( \mathbf y^\top \mathbf y - \mathbf y^\top \mathbf X \boldsymbol \beta - \boldsymbol \beta ^\top \mathbf X^\top \mathbf y + \boldsymbol \beta ^\top \mathbf X^\top \mathbf X \boldsymbol \beta \right)}{\partial \boldsymbol \beta} \\ = -2 \mathbf X ^\top \mathbf y + 2 \mathbf X ^\top \mathbf X \boldsymbol \beta = \mathbf 0 \end{aligned} \tag{5}
\mathbf X^\top \mathbf X \boldsymbol \beta = \mathbf X^\top \mathbf y \tag{6}
This leaves us with the expression in Equation 6. To isolate the coefficient vector \boldsymbol \beta, we need to take the inverse of \mathbf X^\top \mathbf X. With that done, we can formulate the analytical solution to the least-squares problem as follows: \boldsymbol \beta = \left( \mathbf X^\top \mathbf X \right)^{-1} \mathbf X^\top \mathbf y \tag{7}
So we have found the analytical solution to the least squared problem. Now let’s implement this in R code. For illustrative purposes, we’ll compute the vector \boldsymbol \beta without the lm function of the stats package. Note that the %*%-operator performs the matrix multiplication.
beta <- solve(t(X) %*% X) %*% t(X) %*% y
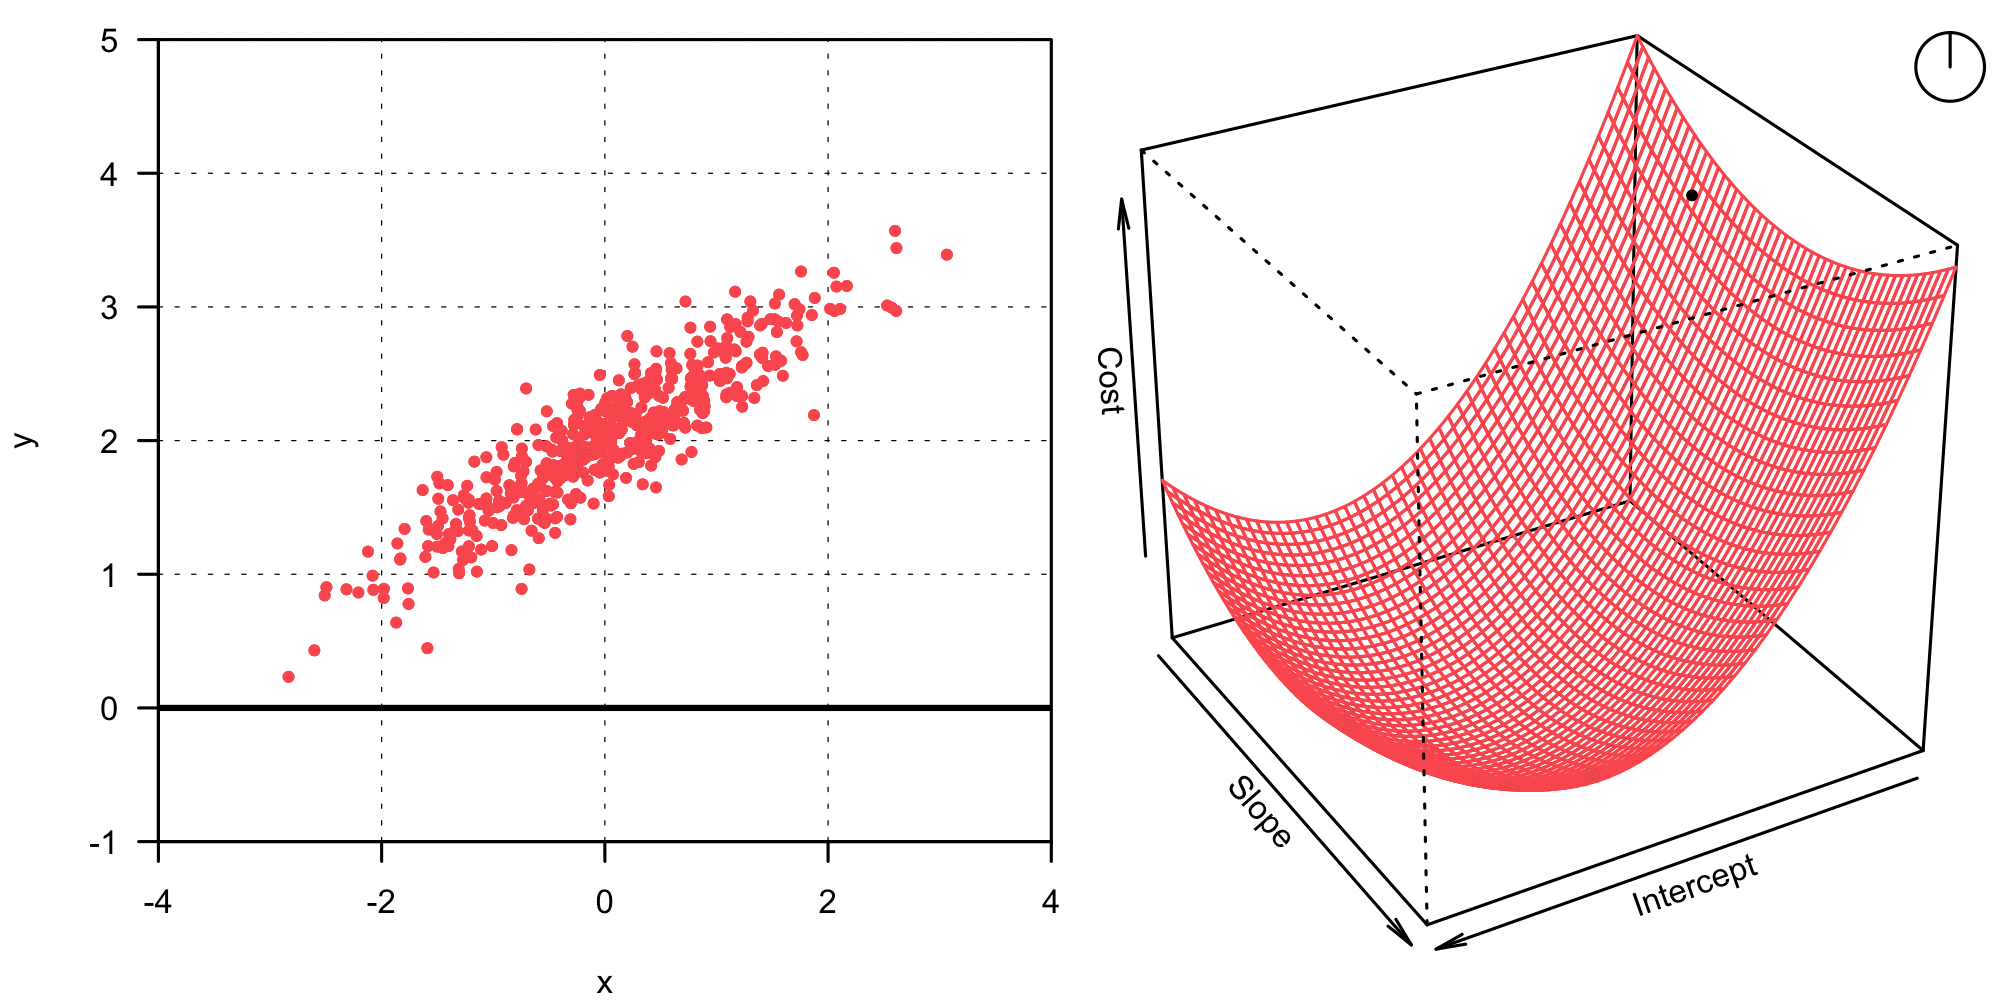
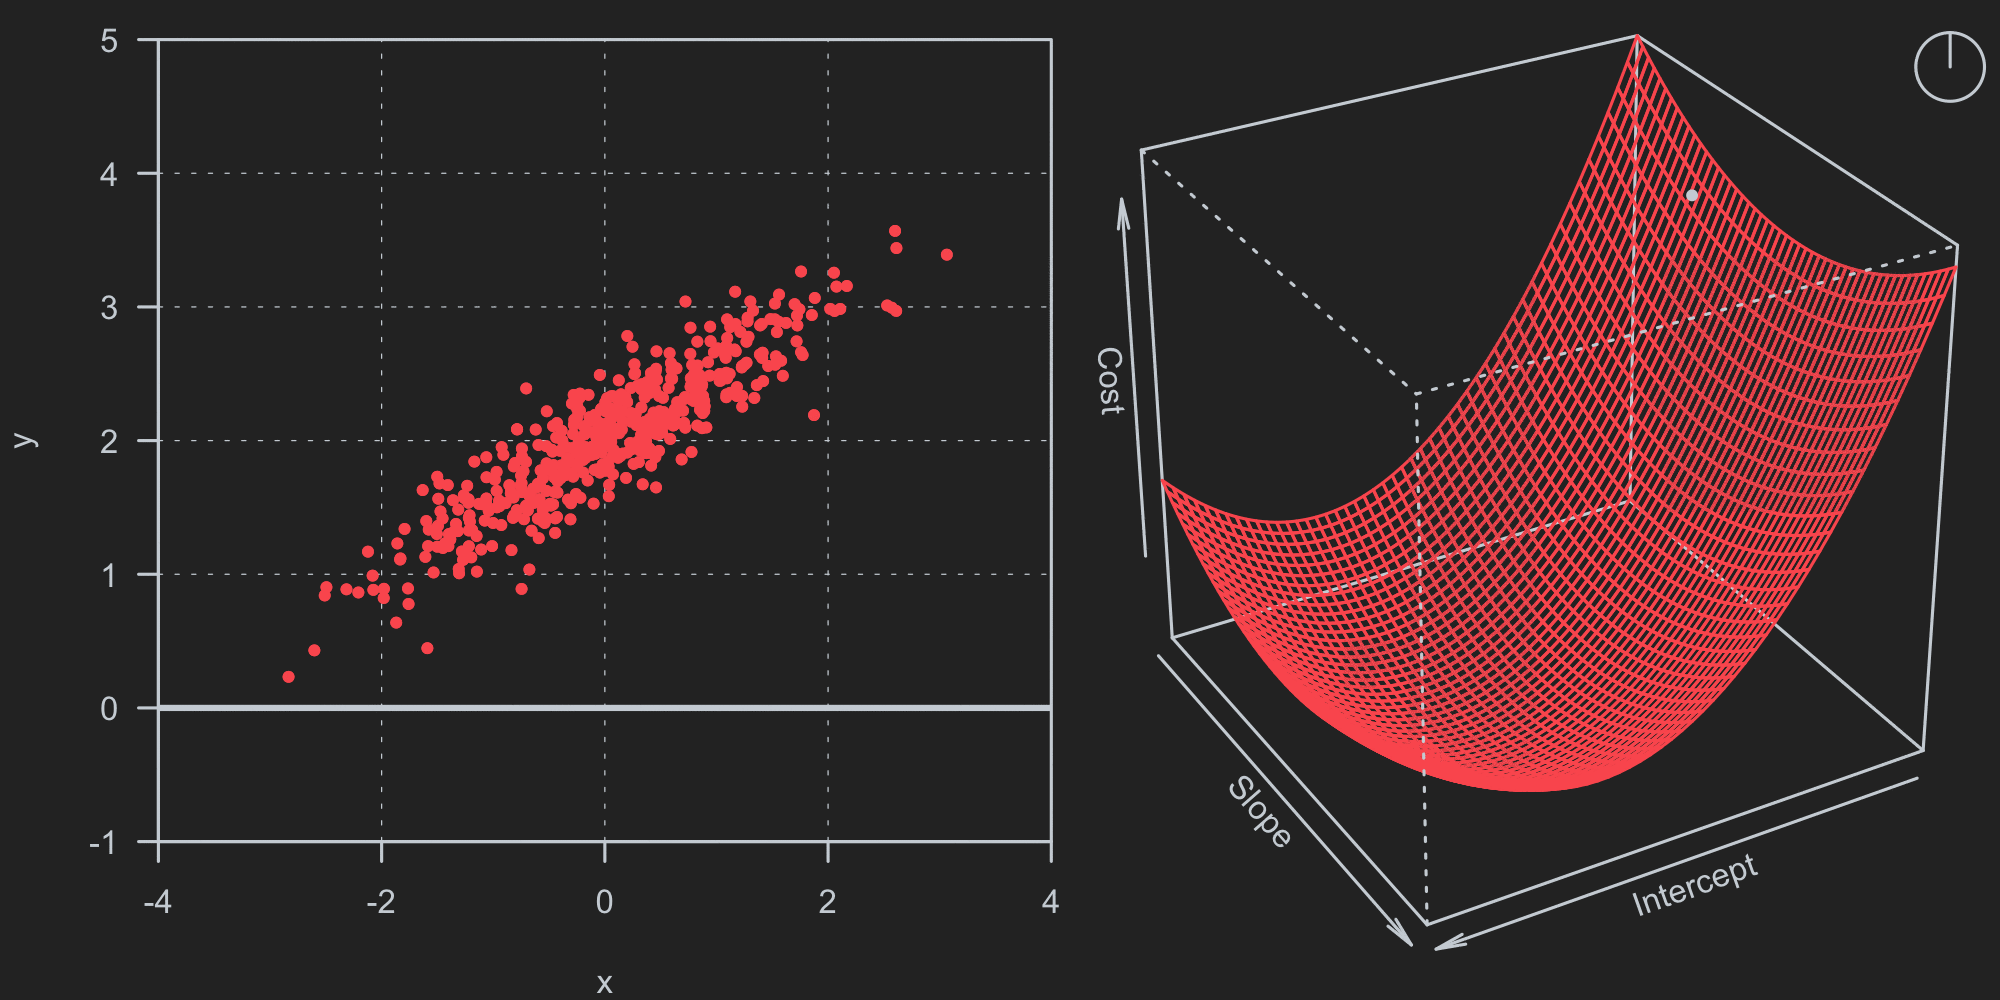
plot(data)
abline(beta)Plotting the data and adding the ordinary least squares fit should leaves you with a visualization such as the one below.


This seems to have worked out nicely, as the regression line fit the data well. Let’s now look at the gradient descent algorithm in contrast to the analytical solution.
Gradient descent
Gradient descent is one of the most popular optimization algorithms, and it is mostly known for its applications in neural network back-propagation. However, the history of gradient descent goes back far longer — it is generally attributed to Augustin-Louis Cauchy, who already suggested it back in 1847 (1). Yet, it wasn’t until the post-war period and the rise of computational capabilities that gradient descent was studied more intensely.
Background and intuition
In its simplest form, the gradient descent algorithm can be compactly written as in Equation 8. This basic version, also called vanilla gradient descent or batch gradient descent is not very often used in practice, since it suffers from various problems (2). However, it is great to illustrate the idea behind gradient descent. \boldsymbol\beta_{t+1} = \boldsymbol\beta_t - \eta \frac{\partial}{\partial \boldsymbol\beta_t} J (\boldsymbol \beta_t) \tag{8} What does this mean? The gradient descent algorithm iteratively updates the coefficient vector \boldsymbol \beta1 from step t to t+1 by moving a little bit in the opposite direction of the gradient of the cost function \frac{\partial J (\boldsymbol \beta_t)}{\partial \boldsymbol\beta_t}. The cost function J needs to relate to the minimization problem formulated in Equation 3, thus we can define it as follows.2 J(\boldsymbol \beta) = \frac{1}{2n} \| \mathbf y - \mathbf X \boldsymbol \beta \|_2^2 \tag{9} The gradient of this cost function with respect to \boldsymbol \beta is now calculated analogous to what we did in Equation 5, it can be stated as: \frac{\partial}{\partial \boldsymbol\beta} J (\boldsymbol \beta) = \frac{1}{n} \mathbf X^\top \left( \mathbf X \boldsymbol \beta - \mathbf y \right) \tag{10} The gradient tells us in which direction the function value increases most — thus we need to update \boldsymbol \beta_t into the opposite direction in order to minimize the cost and find a good model fit. How quickly we move into said direction is controlled with the step-size parameter \eta, which is also called the learning rate. Choosing a good value for \eta is crucial for the gradient descent algorithm to work well. A too large \eta will lead to the overshooting of the goal, and \boldsymbol \beta diverges. On the other hand, a too small \eta means that tiny steps are taken at every iteration — we’ll have to wait much longer for the algorithm to converge than what would be necessary. The animation below shows how better combinations of intercept and slope are found iteratively with the gradient descent algorithm.
1 When dealing with something other than a linear regression model, the parameter vector \boldsymbol \beta might go under a different name such as \mathbf w for neural networks or \boldsymbol \theta for a general case.
2 In this case, we scale the cost function with \frac{1}{2n}. This makes sure we compute the average cost, i.e. the expected cost doesn’t increase with additional observations in \mathcal D. The 2 in the denominator simply leads to a nicer gradient – the found solution will stay the same though.
In the case of the animation above, the learning rate \eta seems a little bit too small. At any rate, the algorithm converges and finds the same solution as the analytical approach did before. Now that we understand how the gradient descent algorithm works, we can implement it in R without any problem!
Implementation in R
First, let’s write out the cost function J(\boldsymbol \beta) as defined in Equation 9. This function evaluate how well the model fits our data given the coefficient vector \boldsymbol \beta and the data itself.
cost <- function(X, y, beta) {
   1/(2*length(y)) * sum((y - X %*% beta)^2)
}
Next, we write a function to compute the gradient of J(\boldsymbol \beta) according to Equation 10 given a current coefficient vector \boldsymbol \beta and the data.
gradient <- function(X, y, beta) {
   1/(length(y)) * t(X) %*% (X %*% beta - y)
}
Finally, we can put everything together. We’ll write a function gradientDescent, which runs the gradient descent algorithm. The starting values for the coefficients are \boldsymbol \beta_{t=0} = \mathbf 0. While running our gradient descent algorithm, we will store the intermittent results in a data frame called history. This very simple version of the gradient descent algorithm only needs two controlling parameters, so-called hyperparameters: we have the learning rate \eta (eta), and a number of iterations (iterations) which defines when the algorithm stops. The gradientDescent function returns the entire history as a data frame with iterations + 1 rows.
gradientDescent <- function(y, X, eta = 0.1, iterations = 200){
beta <- rep(0, ncol(X))
history <- data.frame(Intercept = as.numeric(beta[1]),
Slope = as.numeric(beta[2]),
t = 0,
Cost = cost(X, y, beta))
for (t in 1:iterations) {
beta <- beta - eta * gradient(X, y, beta)
history <- rbind(history, c(beta, t, cost(X, y, beta)))
}
return(history)
}- 1
- Define starting values for \boldsymbol \beta.
- 2
-
Create the data
historyframe to save intermittent results. - 3
-
Run the gradient descent algorithm repeatedly for
iterationstimes.
Finally, we can run the gradient descent algorithm on our synthetic data. For now, we arbitrarily choose a learning rate of eta = 0.5 and set the number of iterations to iterations = 10.
history <- gradientDescent(y, X, eta = 0.5, iterations = 10)We can have a look at how the gradient descent algorithm iteratively found better values of \boldsymbol \beta in table 1. Note how the change of cost given a certain parameter vector \boldsymbol \beta decreases dramatically and quickly reaches zero.
| t | Intercept | Slope | Cost | Change of cost |
|---|---|---|---|---|
| 0 | 0.000 | 0.000 | 2.182 | |
| 1 | 1.010 | 0.262 | 0.555 | -1.627 |
| 2 | 1.511 | 0.387 | 0.156 | -0.399 |
| 3 | 1.760 | 0.445 | 0.058 | -0.098 |
| 4 | 1.883 | 0.472 | 0.034 | -0.024 |
| 5 | 1.945 | 0.485 | 0.028 | -0.006 |
| 6 | 1.975 | 0.491 | 0.027 | -0.001 |
| 7 | 1.990 | 0.493 | 0.027 | 0.000 |
| 8 | 1.998 | 0.495 | 0.027 | 0.000 |
| 9 | 2.002 | 0.495 | 0.027 | 0.000 |
| 10 | 2.004 | 0.495 | 0.027 | 0.000 |
Finding well working combinations of hyperparameters such as eta or iterations in our case is called hyperparameter tuning, or hypertuning for short. We might plot the history of the cost function value J(\boldsymbol\beta_t) for different learning rates \eta to see how the learning rate influences convergence speed.


It seems like a learning rate of \eta = 1 is working well in our case. But keep in mind that this differs from case to case. Also, there are plenty of things that could be improved about our gradient descent function. For example, we could stop automatically if the decrease in cost involved is sufficiently small, as illustrated in table 1. To deal with huge datasets, we could also implement stochastic gradient descent, or even adaptive learning rates or momentum based methods such as the adam optimizer, which was introduced in 2014 (3). Furthermore, it would be wise to normalize the data before running the algorithm.
Conclusion
In this brief blog post, we have looked at how to find the coefficient vector \boldsymbol \beta for linear regression first via the closed-form solution, and second via an iterative optimization such as the gradient descent method.
But why would we need gradient descent on linear regression in the first place? In the given example with only two parameters to estimate and just a few thunder observations, using the gradient descent method would not be particularly wise. In such cases where the design matrix \mathbf X is not too large, the analytical solution is fast and reliable. However, if you think back at Equation 7, we needed to compute the inverse of a p \times p (with p being the number of columns in our design matrix \mathbf X) matrix in order to estimate \boldsymbol \beta via the analytical solution.3 This operation does have a worse time complexity with regards to p than the gradient descent solution (4). Therefore, the gradient descent algorithm can have some use cases for linear regression, specifically if the number of coefficients to estimate is very large and if we are not interested in the precise coefficients, but rather in a sufficiently good test set error.
3 In practice, the analytical solution is found via a factorization such as QR, where we perform some other mathematically equivalent manipulation which is more numerically stable than inverting \mathbf X^\top \mathbf X.
References
1.
Lemaréchal, C. Cauchy and the gradient method. Doc Math Extra 251, 10 (2012).
2.
Ruder, S. An overview of gradient descent optimization algorithms. arXiv preprint (2016).
3.
Kingma, D. P. & Ba, J. Adam: A method for stochastic optimization. arXiv preprint (2014).
4.
Mani, A. Analytical vs gradient descent methods of solving linear regression. (2022).
Reuse
Citation
BibTeX citation:
@online{oswald2023,
  author = {Oswald, Damian},
  title = {Linear Regression with Gradient Descent},
  date = {2023-02-05},
  url = {damianoswald.com/blog/gradient-descent-linear-model},
  langid = {en},
  abstract = {In this blog post, the analytical solution for the linear
    regression model is explored, and it is compared with the gradient
    descent algorithm using a synthetic dataset for illustration. The
    intuition behind gradient descent is further discussed, its
    implementation in R is detailed, and the importance of
    hyperparameter tuning for optimal performance is emphasized.}
}
For attribution, please cite this work as:
Oswald, D. Linear regression with gradient
descent . damianoswald.com/blog/gradient-descent-linear-model
(2023).